Since 2000 till now, I have spent almost USD13,000 on Mountain Bicycles for myself and family members. Recently I have given advised to one of our reader on getting a customized bicycle. Today he is telling me he loved it. So I thought I might just share this post with you guys. I am not bragging what I have but hoping you do not repeat my mistakes before.
Firstly, I do not recommend buying a complete Setup bike unless you are just using it for transport purposes. As your interest in biking grows, you will likely upgrade bike components and wasting money on your existing components. Next, what do you want to use the bike for. For me, I want my bike able to tour with it, MTB, leisure riding and do grocery shopping.
- Bike Frame Size and Types
- Budget and Choosing Bike Components
- Tools
- Setting Up the Bike
1. Bike Frame Size and Type
Before buying a bike you need to know the size of the frame that suit you. Below are charts for both road and mountain bikes. In my opinion the correct bike frame size should take measurement from your Inseam (measurement for floor to crotch) without shoes and not your height. Some people are tall but have shorter legs and others are short but have long legs.

12" XXSMALL 26.3"
14" XSMALL 27.4"
16" SMALL 28.6"
18" MEDIUM 29.9"
20" LARGE 31.7"
22" XLARGE 33.3"
My Inseam is 28" so I chose a bike between Small and XSmall frame and should be below the stand over height. Stand over height is the measurement of the bike from ground to top tube. My current bike frame size is 15.5", 15" would be the ideal size but the frame did not have any 15". Below is a photo how you measure the bike frame size. Bring along a tape measure because some bike frame are not identified by Inches, small size could be between 14.5" to 16".


Now you know your bike size, time for selecting the frame. There are many types of frames, full suspension, ladies frame, steel, aluminium, titanium, carbon fibre. Steel bike frame is highly recommended if doing world tour.
I decided to choose a steel frame because they are easier to repair by welding if there is any crack and they are much rigid. Most of the bike these days are made from Aluminium however you have to look out the types of aluminium used. Recommended is 6061 or higher grade is better. These are aircraft grade aluminium. The disadvantages of aluminium are problems finding a aluminium welding shop if doing world tour and aluminium gets dented easily.
My bike frame came from the same factory that build Surly bikes. Most World Bike Tourist would prefer a Surly bike frame. Their frame weight is rather acceptable and some are even lighter than other Aluminium bike frames. My bike frame weighs around 2Kg.
When I chose the bike frame, I have considered few things so that my existing bike components can be reused. The other extra stuff that I have bought were the seatpost and headset because the tubing are smaller.
Choosing the colour was rather important, since I want to use this bike for daily rides such as going grocery shopping, I do not want my bike to stand out in the crowd and attract attention to any hijackers. I have too many expensive components on the bike which will be discussed in the below topics.
My consideration for the bike frame
- Disc brake mount
- Mounting point for rear racks
- Head set size
- Seat post size
- Bottom bracket size
- Mounting for rear fender
- Colour
2. Budget and Choosing Bike Components
Today's Bike frames are the least expensive unless you are investing in a full suspension bike frame or other material bike frame except Aluminium and Steel. Bike components are what makes the bike expensive and how the bike will make you feel good.
We have 2 bikes with almost complete Shimano XTR and SLX setup. Shimano makes one of the best bike components in the world, ranging from the lowest Alivio to the top range XTR. Frankly do not consider XTR unless you race or weight weenies like me. Their XT Deore range is worth considering if you have the $$$. If short of $$$, I would recommend their SLX range but not compete setup.
Since 2002 till now, my XTR components have been swapped on 3 bike frames. Investing in the right setup is worth considering. Set a budget for yourself and identified which of the components worth investing.
Recommended components investment
- Wheel Sets
- Drive Train
- Brakes
 |
| This MTB bike frame Giant Trance X0 cost around USD1600 and the components on it cost around USD2500. I was an idiot to invest in it and hardly use it for daily rides except MTB for fear of getting it stolen. Totally unnecessary pressure on myself but it did give me the fun ride. |
Wheel Sets
These are the the rolling energy transmitted to them each time you crank. Wheel sets also takes all your weight including the gears you carry. It also absorb all the shocks from the terrain. It should be the first priority in your components lists investment.
Our bike's wheel sets were specially customised. Both bikes uses Mavic XC 717 Disc Rims with 36 DT Swiss Spokes. I preferred to use 36 spokes rims because the spoke lengths are easily available if needed replacement. Mavic makes one of the stronger and lightweight bikes rimes, our bike rims can be suited to use either Presta or Schrader inner tube.


Hub is the next important part in the wheel set. It absorb all the forces from the wheel. One of our bike uses XTR and another uses XT. There is a great difference in the wheel roll. Noticeable the XTR rolls better than XT with lesser resistance. In another word when cycle, XTR will be smoother. My thoughts XT is good enough. There are other brands out there in the market, another good brand is Hope, they make race ready Hubs.
Customised wheel sets can be arranged with any bike shops. It is the quality of tuning the wheels makes it important. An improper tuning of the wheel sets can cost you damaged rims. To know if your wheel set needs tuning, secure a maker on the part where it almost touching the rims. Rotate the wheel and watch the clearance between the marker and rim, if you see uneven clearance or marker touches the rim, that means you wheel set needs tuning, send it to a professional shop or you can find DIY info on Youtbe.
If your are interested in building rims and hubs, you can try the wheel building calculator


Drive Train
Drive Train consist of 2 sets of component. This will determine how smooth the cranking on the wheels and how smooth gear changing. Dive Train will absorbed energy from your legs and transmit to the wheels.
Few of the components worth investing are the Crankset, Deraillur and the Shifters. Crankset is one of the heaviest component on the bike. The weight difference between the XTR and SLX is only 119gm but the price is 3 times difference.
The cranksets consist of crank arm, chain rings and bottom bracket. Normally they comes in complete sets, however you can use after market parts to replace. Those days when we MTB, sometimes we would ride using the outer chain ring to bite into the log and ride over. On the XTR crankset, I have replaced Middleburn Chain Rings. They are lighter and stronger and makes the ride a huge difference.
I have ridden 4 different cranksets, XTR, XT, SLX and Race Face. Not sure the reason but me and my friends did find the XTR crankset was much smoother. Maybe it could be the chain rings design. In another words, you can invest in a SLX cranksets and with the money saved from investing XTR, get the Middleburn Chain Rings. Another benefit, the SLX Cranksets can be transformed into a single geared bike but not with my current XTR crankset.


Gear shifts consist of Front, Rear Derailleur and Shifters. The most commonly used is the Rear Derailleur. A good derailleur with shifter combo will make gear shifting very effective and smooth. For average rider SLX Rear Derailleur and Shifters are good enough however the Front Derailleur, you can opt for cheaper range such as Deore as we hardly shift the front chain rings.


 |
| No need to invest in good Front Derailleur |
Do not get the all in one brake and shifter combo. It was a mistake that I have invested in it, not saying it is a bad shifter but maintaining is a nightmare. There are too many small screws just to change the shifter cable. However they are extremely light when shifting gears. Glad Shimano has stopped the production.


Brakes
Having a good Braking system is essential. There few different kind of brake systems and all of them have their pros and cons.
- Hydraulic Disc Brakes
- Cable Disc Brakes
- V-Brakes
Hydralic Disc Brakes are the most effective and responsive braking system. They are very ideal for MTB going off-road. If you are not planning for such ride, forget this braking system because it is expensive. It is not ideal for World cycling as maintenance can be very messy. But if you have a good brake set, maintenance will be less frequent.
Since 2002 my XTR brake set have only recently been serviced with hydraulic oil change. Brake pads and disc till now have not even been replaced. Both the XTR and SLX brake calipers uses the same kind of brake pads. There are 2 different brake pad materials, resin and metal. Metal brake pads are proven more effective than resin but when wet, sometime it will cause a screeching sound.
Since 2002 my XTR brake set have only recently been serviced with hydraulic oil change. Brake pads and disc till now have not even been replaced. Both the XTR and SLX brake calipers uses the same kind of brake pads. There are 2 different brake pad materials, resin and metal. Metal brake pads are proven more effective than resin but when wet, sometime it will cause a screeching sound.
If anytime you feel the brake lever is spongy, that means there is air trapped in the hydraulic oil. You will required to bleed the system. It is a messy job and might need 2 person to do it. A bleeding tool can be constructed easily using a syringe and fish aquarium air hose.


Cable disc brakes are not so responsive as hydraulic disc brakes but at least they are better than V-brakes. Cable disc brake problems lies in the cable itself, constant use of the braking will cause the cable to stretch and frail. They are heavier than V-brake but still prove to be a better braking system comparing to V-brakes.
Most world tourist prefers V-brake as they are lighter and easy to maintain. However from my view, V-brakes are much heavier simply because you will need a thicker rims wall and that adds weight to the bike. Constant braking will also wear the rims wall down. If you have invested in a good rim, why wear the rims down?
3. Tools
If you are planning to service your own bike, it is wise to invest in the right tools. Previously, I had to maintain 4 family bikes so investing in these tools was the right option. Sending a single bike to a bike shop would cost. Learning how to service a bike can be found on YouTube.


 |
| Must have Special Tools for bike maintenance |
 |
| A must have tool if you have air suspension system |
 |
| DIY Brake bleeder |
 |
| Previously used on motocross bike throttle cable, now it service on the bicycle cable maintenance to clean off any dirt in the cable housing so that the cables can be shifted smoothly |
 |
| The Park Tool wrench is used for both XTR and SLX cranksets |
 |
| These tools are used for rear cassette removal during maintenance |
 |
| must have foot pump if you have more than 2 bikes to maintain |
4. Setting Up the Bike
This topic will cover on
- Seating Position
- Handlebar Position
- Suspension Settings
- Others
Seating Position
There are 2 settings, correct cranking position and seat height distance.
First we need to set the seat height position. The correct seat height position, knee must be slightly bent at the lowest point of the crank. This adjustment can be done moving the seat post height. If you are doing technical riding like riding obstacles, it is best to lower the seat height.
 |
| Photo from BikeRadar |
To set the correct cranking position, set the crank at 3 or 9 o'clock. Use a string with weight or tape measure, the string must be perpendicular from the knee cap boney part to the pedal mid centre. This adjustment can be done by moving the seat forward or backwards on the seat post.
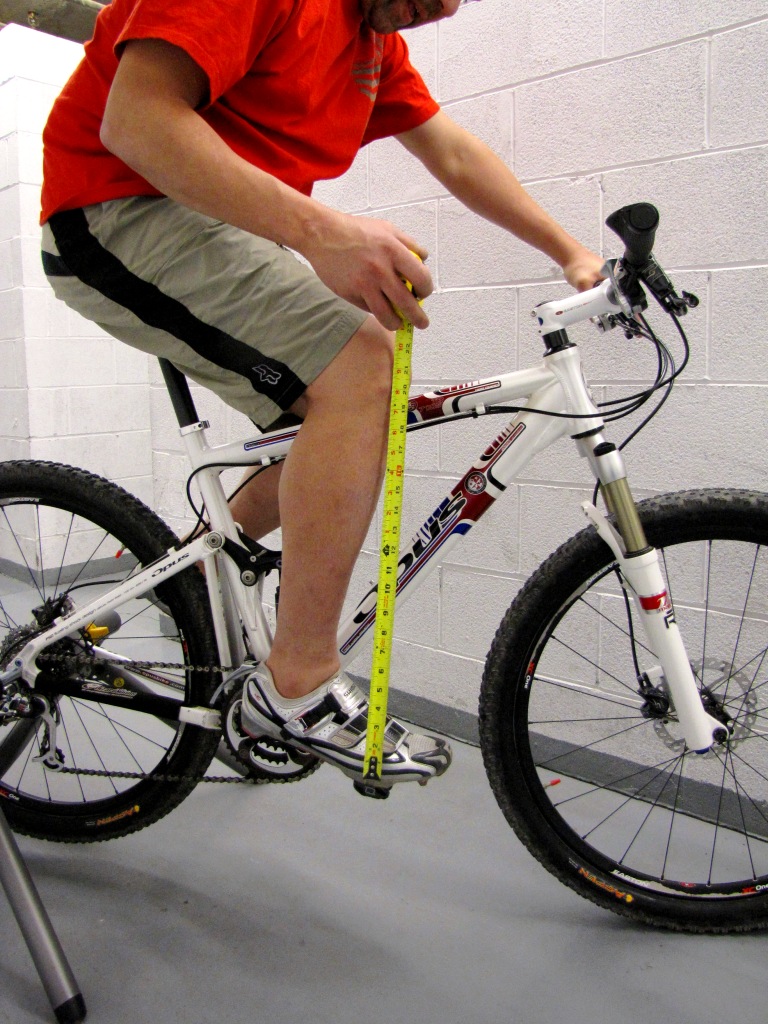 |
| Photo from SingleTrack |
There are 2 different types of seat post, straight and off-set seat post. Normally an off-set seat post are used on riders with longer legs. Using off-set seat post will also depends on handlebar distance which is discussed on the next subject. Sometimes an off-set seat post will post problem to secure a rear tool bag as it creates too far distance. In general a straight seat post is much better.
Most seat post can be adjusted for different angle. If you are sliding forward most of the time, tilt the angle of the seat nose pointing upwards. It is recommended to choose seat post of 2 screws mounting just like the photos below. They secured the seat firmer.
 |
| Off-set Seat Post, I can't secure saddle seat tool pouch on such seat post |
 |
| Straight Seat Post |
Handlebar Position
Before making this adjustment, make sure you have set the seat adjustment first. There are many types of handlebar, straight bar, riser bar, short bar, long bar etc. Generally I preferred riser bar, it is more comfortable to ride as our body are slightly upright and it gives less strain to the shoulder. Because of the upright position, it will created more wind resistance.
Most XC racers prefer straight bar so that they can leaned lower to create less wind drag. However riser bar handles better in off-road condition for any types of obstacles, it assist well as your arms are spreaded making lifting the front end of the wheel much easier such as riding over a log or absorbing shocks from a downhill ride.
 |
| Riser Bar |
Previously I had a 90mm stem on the other bike. After using the same stem on the new bike frame, I felt strained on my shoulder. I soon realised my stem was too long for this bike frame as the wheelbase of the 2 bikes was different. I have just ordered a 60mm stem to replace it.
Shorter stem has other benefits, it handles better during off-road or downhill, the material use is lesser and making it lighter. It's disadvantages is when going on a climb, your front wheel will get very light and losing traction. Just like the riser bar, it also creates wind drag as your body posture is higher.
My choice of setting is for more control, fun and comfort. If you want speed than go for a straight bar and longer stem but the handlebar setting position remains the same.
Also to note the handlebar thickness, most riser bar is 31.8mm so choose your stem correctly.


 |
| 90mm Stem, measured from centre to centre |
Suspension Settings
If you have a good suspension such as Fox, there is a manual to guide you. Setting Suspension is a complex matter. Not easily understood by many, I have learnt these setting during the days of motocrossing, it took me a year to perfect my bike suspension setting skills. There are few things to note, Race Sag, Rebound Damping and Compression Damping and it will require days and many rides to set the suspension correctly. Suspension setting also depends on the types of terrain you are riding from rocky to flat road, fast or slow and rider's weight.
First setting to note is Race Sag. The front fork or rear shock should have an O-ring on the tube, if not use a ty-rap, make sure is not too tight on the tube and lower to the dust cap. If your fork is a 100mm, fully geared, sit on the bike. Get off the bike and measure the distance from the dust cap to the ty-rap. It should read 20mm. Setting race sag is always 20% from any tube length.
To adjust this settings, if you have air suspension, you will need a special air pump as indicated on the Tools photo. This tool will allow you to pump or release the air in the tube. Spring suspension can be adjusted from the knob above the fork. Normally there is only one spring on the fork suspension.
Rebound Damping controls the stability and cornering of a bike. It depends on rider's weight, gears carried and types of terrain. Faster the rebound the more shock your arms will absorbed. For riders who play jump, you want a slower rebound, a fast rebound will cause the bike to dip and head on crash. To set rebound for average riders, turn the knob all the way in and then 5 clicks out, push the suspension down and ensure the rebound is not too fast also not too slow, keep tuning the knob till satisfaction. Fast rebound is used in slow speed and slow rebound is used on fast speed, rocky terrain will also uses slow rebound. There is no right setting for this so is all up to your feeling.
Compression damping setting is set to absorb the rebound setting. This will determine how much oil flow in the suspension. If you feel the rebound setting is good but still feel the shock, try adjusting this setting.
An ideal suspension must have a lock out, that means you can lock the suspension to become a rigid bike. This is very ideal when you are doing a hill climb. You do not want your cranking energy to flow to the suspension. That is why a rigid road bike climbs a hill better than a MTB with lesser energy.
 |
| Fox Talas has the ability to manual Lock Out |
 |
| Fox F100X is an intelligent fork with automatic lock out, it controls the suspension from the ground and not the rider itself. This Fox Forx had cost USD800 very ideal for XC racers but not a wise investment for average riders. |
Here is a vid on how to adjust all these settings.
Others
These section we will discuss on accessories and pedals. There are 2 kind of pedals, clips on and platform. Clip-on are very useful for hill climbs, it will assist to transmit cranking force both ways, upwards and downwards cranking thus doubling your cranking energy. The best clip-on is by Crank Brother Egg Beater SL, they are lightweight and best used in muddy condition. It will not jam with your clip-on riding shoes and it clips away when you fall.
For touring purpose, Egg Beater will not be my choiced, I will instead opt for Zefal Toe Clip-On. I first started MTB with these clip-on. They are not as good as Egg Beater but it does the same action for cranking. Currently I have these on for daily rides but I will change to Egg Beater when MTB.


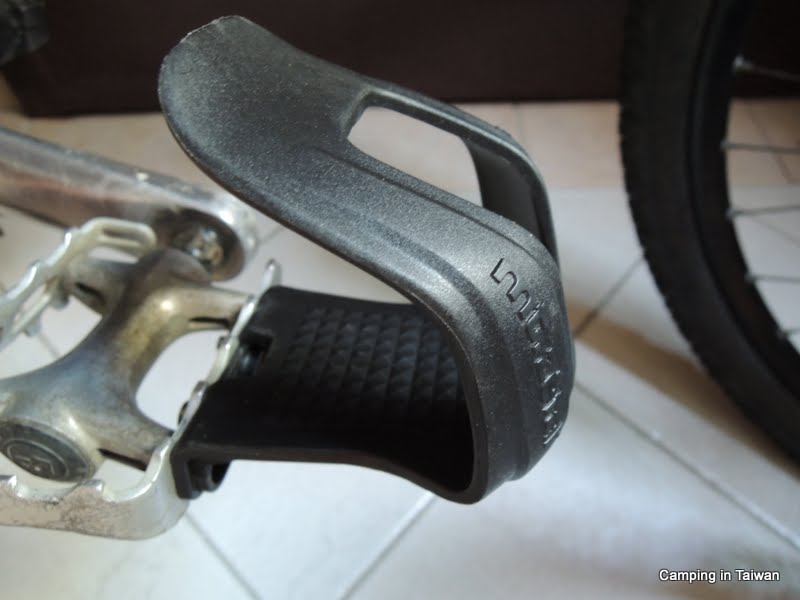 |
| Zefal Clip-On |
Other accessories I have since modified. The idea is try to keep the bike lightweight. Cyclometer have been removed since I have a GPS. GPS is there because I needed to tracked or find places that I have to travel but if it is a frequent riding area then the GPS is omitted. These days our smart phone can do almost the same as a GPS, bike band is very useful to mount for all types of gadgets, they are lightweight and cost cheaply.
For safety, I used a Cateye LED lamp which rans on CR2032 batteries, these batteries comes cheaply and the Cateye LED is lightweight. Also included is a mini Cateye Bell, proofed to be very useful riding around the city. I have used sticker reflectors and night glow stickers instead of hardware reflectors, they are easy to customised, lightweight and cheaper.


Bike Band


Night Glow, ideal if you happen to ride into a tunnel
 |
| Rear sticker reflector |
 |
| Cateye LED can also be used while hiking in the dark |
There are many bike racks and panniers out there in the market, by far today's best bike rack are from Old Man Mountain, till now I have not encountered any stories on OMM racks failure. The best panniers are still the Ortlieb Roller Classic for world tour.


There is a trailer that I love to review, it is made in Taiwan by my friend's company. It called the DOM T2 Trailers. It is a packable trailer which make bike touring rather friendly. Will find time to discuss with them to try this trailer out.
 |
| DOM T2 Trailers |
For MTB I never believed in using water bottle cage, too many times I have experienced loosing the water bottle but there is a water bottle cage worth considering is called the Monkii Mounting Family. For now I use the water bottle cage to mount my air pump as I carry a hydration bladder.

 |
| Does this bike attracts your attention? Guess not, a very classic bike frame and this is what I wanted the bike to be in a stealthy condition. No brand and colour, non attractive but have all the quality components that packs a punch. I might be getting a second frame set. |
I like to thanks my ex-Dutch boss, Mark Koorwinder for giving me his departure present back in 2004. I found this MTB comic novel illustrated book very useful and informative. I have since learnt much from this book.


 |
| me and my ex-Dutch Boss. Hard to find bosses like him these days. |
Hope you guys find this reading material useful. It took me almost 10 hours to composed.
Cheers!!
WOW… I am thoroughly impressed with your hubby, me too is a big fan of bicycle. I love the way you expressed your enthusiasm… that looks like such hard work but the results, gorgeous!
ReplyDelete